All About Selections: From Atoms to Fragments, Residues, Chains and Beyond
GaussView has a wide variety of different methods and techniques for selecting atoms within molecular structures. Groups of selected atoms are used for many purposes in building structures and setting up Gaussian jobs. This section will discuss the various alternatives, which are summarized in the following list:
- Selection-related toolbar icons: Select by Clicking, Select by Marquee, Select All and Select None
- View window selection keystrokes
- Selecting with the Atom List Editor, the PDB Residue Editor, and the PDB Secondary Structures Editor
- Using the Atom Group Editor
- The Atom Selection Editor
Selection-Related Toolbar Icons

 The main window builder toolbar and the standalone Builder palette both contain icons which control item selection behavior and place the cursor in a dedicated selection mode. The icon on the left sets the selection mode to clicking: clicking on an atom toggles its selection mode. Selected atoms appear light yellow (see the two leftmost atoms in the illustration at the right), and their serial numbers are displayed. Contrast this to highlighting where atoms are displayed in light blue for easy identification and/or location (e.g., the hydrogen atom at the lower right). If an atom is both selected and highlighted, it appears light blue (highlighted).

The other selection mode is marquee mode, also called rubberband mode (the icon on the right at the head of this paragraph). In this mode, pressing and holding the mouse button while dragging the cursor will draw a rectangle in the view. When the mouse button is released, all atoms within the defined area are added to the selection. Variations to this default functioning for both modes are available via the Atom Selection dialog discussed below.

 The other two selection-related icons are the Select All and Select None buttons, which select and deselect all atoms in the molecule, respectively.
Selection Keystrokes in View Windows
These same selection options are available at all times in any View window via the following keystrokes, regardless of the current toolbar icon selection:
| |
|
| a |
Select all atoms. |
| n |
Deselect all atoms (select no atoms). |
| r |
Marquee selection is active while the R key is held down. |
| c |
Individual atom click mode selection is active while the C key is held down. |
Selecting with the Atom List Editor and Similar Tools
The Atom List Editor is discussed in more detail in the next section of this book, but a mention of its selection facilities are relevant here. This dialog, illustrated in Figure 29, provides a spreadsheet-like mechanism for viewing and modifying molecular structures and parameters. The same facilities are also provided by the PDB Residue Editor and PDB Secondary Structure Editor. There are three main features:
- All of these tools have the ability to highlight various parts/substructures of the molecule, controlled via the Highlight column. Highlighted atoms can be selected and deselected via the Select/Deselect Highlighted Atoms items on the View menu in the Atom List Editor and the similar Select/Deselect Highlighted Residues and Select/Deselect Highlighted Secondary Structures items in the View menus of the other tools.
- The Rows menus of these three tools all contain the Select Atoms of Selected Rows item. Choosing it will cause all atoms corresponding to selected rows in the spreadsheet to be added to the current selection.
- The Invert Selection and Select All items on the Rows menus modify the selection to include all unselected atoms and to include all atoms, respectively.
Somewhat similar functionality is also present in the ONIOM Layer Editor discussed later, although this facility’s purpose is substantially more specialized.
Using the Atom Group Editor
The Atom Group Editor, reached via the Atoms Groups item on the main Edit menu, allows you to define subgroups of atoms within a structure for various purposes. It is illustrated in Figure 26.
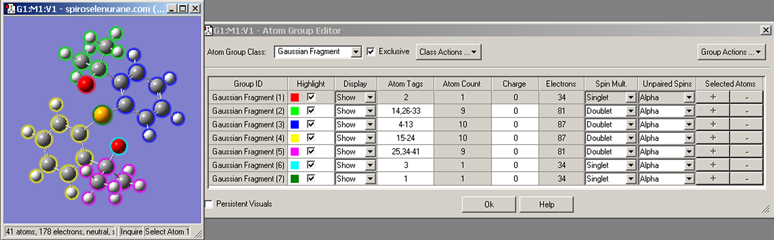
Figure 26. The Atom Group Editor
This dialog is used to define fragments and other atoms groups for various types of Gaussian jobs. A separate charge and spin can be optionally assigned to each fragment (as we are doing here). The Atom Group Class popup lists the various kinds of atom groups for which GaussView provides special handling. The Persistent Visuals causes the settings of the Highlight and Display columns to continue to be honored in the View window even after the dialog is closed.
The various columns in the spreadsheet hold the following data. Group ID holds a name for each atom group, typically the class names with a number. When the checkbox in the Highlight column is checked, the atoms in the corresponding group are encircled with the indicated highlight color. The menus in the Display column allows you to hide the atoms belonging to one or more groups. The Atom Tags field lists the serial numbers of the atoms in each group. You can define groups by entering atom numbers here directly, and the field is also updated when atoms are added to or removed from groups by other methods. The Atom Count column lists the number of atoms in the group and the Electrons column lists the number of electrons (both are read-only). The Charge, Spin Mult and Unpaired Spins columns may be used to set per-fragment charges and spin multiplicities (an example is described later). Finally, the plus and minus sign buttons in each row may be used to add or remove all currently selected atoms from the corresponding group.
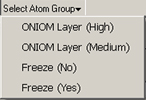
Once atom groups are defined, the Select Atoms and Deselect Atoms items on the Group Actions menu can be used to select/deselect atoms within an atom group. The other items on this menu have the following uses:
- New Group: Add another group of the current group class. For example, selecting this item in Figure 26 will add another Gaussian Fragment group.
- Remove "item": Removes the selected atom group. Any atoms in the group are assigned to the first group.
- Add Selected Atoms to/Remove Selected Atoms from: Equivalent to the plus and minus buttons in the Selected Atoms column.
Note that this dialog serves to assign atoms to named groups. None of the items here have any effect on the structure or ever remove any atoms from the molecule.
The defined classes of atom groups are as follows:
| |
|
|
| Gaussian Fragment |
Define atom fragments for use in molecule specifications, for a fragment guess, and the like. |
Guess panel: Use fragments (atom groups) for generating guess |
| ONIOM Layer |
Define regions using different model chemistries for ONIOM calculations. |
Method panel: Multilayer ONIOM Model |
| Freeze |
Specify frozen atoms for geometry optimizations. |
Adds freeze status column to the molecule specification. |
| NMR Spin-Spin |
Specify atoms for which to perform spin-spin coupling calculations during an NMR job. |
Job Type panel for NMR: compute spin-spin couplings |
| Select Normal Modes |
Specify atoms with which to select normal modes in frequency calculations. |
Job Type panel for Frequency or Opt+Freq: Select Normal Modes |
The Class Actions menu allows you to create a new type of atom group, to reset the atom group assignments to the default (all in the first group), to remove an atom group class and to rename a class.
There are two other important controls in this dialog:
- The Exclusive checkbox causes each atom to belong to exactly one atom group. When checked, if an atom is placed into an atom group, it is removed from its present group automatically. It is required for all of the atom group types used for various Gaussian calculation types. It is off by default for the Gaussian Fragment class, but the setting sticks once you enable it.
- The Persistent Visuals checkbox controls whether the highlighting and show/hide display settings are retained in the View window when the Atom Group Editor is closed. It is unchecked by default.
The Atom Selection Editor
The Atom Selection Editor, reached via the Edit=>Atom Selection menu path, brings selection capabilities and tool preferences. It is illustrated in Figure 27.
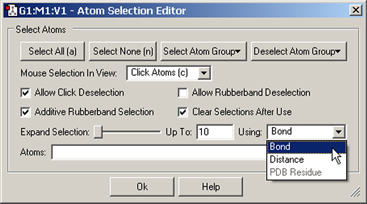
Figure 27. The Atom Selection Editor
This dialog allows you to select all atoms, no atoms, and to select and deselect by atom group. It also sets default behaviors for click and marquee selection. You can also expand the current selection to adjacent atoms using the slider, with proximity defined by bonding, distance or PDB residue as well as a maximum value. Here, we are preparing to expand the selection to atoms bonded to already-selected atoms.
The buttons at the top of the dialog again provide ways to select all atoms, no atoms, or the atoms within a specific atom group. The latter two buttons function as pull down menus whose contents consist of all defined atom groups for the current structure (as in the example at the left for which two different group classes are defined).
The checkboxes and popup menu in the central portion of the dialog specify defaults for the two selection modes. They have the following meanings:
| |
|
| Mouse Selection in View |
Specifies the default selection mode in View windows. |
| Allow Click Deselection |
When unchecked, clicking again on a selected atom has no effect. |
| Additive Rubberband Selection |
When unchecked, each marquee selection replaces the current selection rather than adding to it. |
| Allow Rubberband Deselection |
When checked, marquee selections toggles the select status of all atoms in the enclosed region. |
| Clear Selections After Use |
When unchecked, selections are retained even after an operation has acted on the component atoms. |
The Expand Selection slider allows you to expand a selection to include atoms adjacent to already-selected ones. The Using popup specifies how “adjacent:” atoms are identified: by bonding, by absolute distance regardless of bonding, by PDB residue. The choice made here affect what atoms will be added to the selection as the slider is moved to the right, and the Up To field indicates the maximum value corresponding to the right end of the slider: number of bonds, distance in Angstroms, number of residues. Thus, moving the slider all the way to the right when Up To is 5 and Bond is selected will select all atoms within 5 bonds of all currently selected atoms. When PDB Residue is selected, then each step selects an entire PDB residue.
The list of selected atoms appears in the final Atoms field, which you can also edit directly.